Plenty of stories to be found on logon issues with a Active Directory domain account on a Linux system. I also ran into this issue where about 80% of the time the logon would fail. The articles found give several suggestions to check but none of them would work for me. Eventually combing through the log files found some errors indicating it did not understand the GPO (Group Policy Object) data it received.
Thus placing the computer object for the LInux system into an Organization Unit in Active Directory and disabling all GPO inheritance on this OU resolved all logon issues.
It’s an easy check to do in case you would run into similar issues. As this was a new test environment there were no user based GPOs yet at the time of writing this article.
When trying to use VeraCrypt on a Windows 11 system it kept crashing (BSOD) when trying to mount a VeraCrypt Volume. Found plenty of articles that more people had this issue, however none that stated what format the VeraCrypt Volume had. As my case didn’t involve using existing volumes did several tries and found that the file format seems to cause the issue. By changing the format to NTFS all is working well, however this does require to pay a bit of attention as FAT is the default choice, also on Windows 11. For people that have run into issues with existing used volumes one could opt to use a Linux (virtual) machine to move data over to an NTFS volume, as it is impossible to mount on Windows 11.
Had issues getting the ownCloud client to work after doing an inplace upgrade from Ubuntu 20.04 LTS to 22.04LTS. Read various other articles that didn’t really help me. Most did point to the official ownCloud repository and in there is a file called install.sh, looking at that this would do all the tasks required to get the repository working and install the ownCloud client as well. After doing this, without uninstalling the current non working client, it was working. The only thing was that I had to disable and enable the “Launch on Startup” option and it was done. It is safe to say that the client in Ubuntu’s own repository will also get updated at some point in time and it becomes a non issue. Below are the steps performed.
Download the install.sh file via a webbrowser (you can of course use wget as well): https://download.owncloud.com/desktop/ownCloud/stable/latest/linux/Ubuntu_22.04/INSTALL.sh
Open the terminal and executed the following command in the folder where the INSTALL.sh file was downloaded): sudo sh .\INSTALL.sh
Start the ownCloud client
Disable and Enable the “Launch on Startup” setting on the Settings tab.
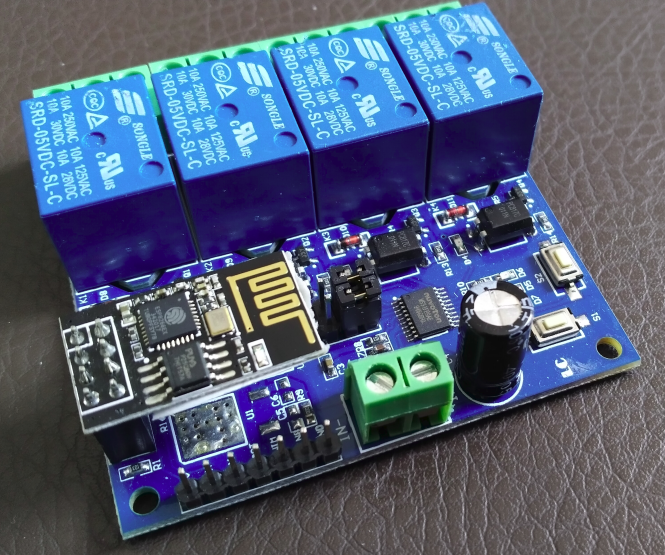
Wanted to get this LC Technology WiFi Relay X4 with Nuvoton MS51FB9AE controller working with Tasmota. It took a bit of tinkering but with the following changes do have it running.
After flashing the ESP01 module supplied with the board with Tasmota the following configuration changes made the module working with the 4 onboard relays so they can be configured with your home automation controller.
Configuring the template:
Name
Based On
GPIO0, 2 , 4 and 5
GPIO1
GPIO3
GPIO9 and higher
LC-ESP01-4R-5V
4 Channel (13)
User
Serial Tx
Serial Rx
None
After configuring the above a rule needs to be added in the console, copy the below code and paste it within the console of Tasmota:
Rule1 on System#Boot do Backlog Baudrate 115200 endon on SerialReceived#Data=41542B5253540D0A do SerialSend5 5749464920434f4e4e45435445440a5749464920474f542049500a41542b4349504d55583d310a41542b4349505345525645523d312c383038300a41542b43495053544f3d333630 endon on Power1#State=1 do SerialSend5 A00101A2 endon on Power1#State=0 do SerialSend5 A00100A1 endon on Power2#State=1 do SerialSend5 A00201A3 endon on Power2#State=0 do SerialSend5 A00200A2 endon on Power3#State=1 do SerialSend5 A00301A4 endon on Power3#State=0 do SerialSend5 A00300A3 endon on Power4#State=1 do SerialSend5 A00401A5 endon on Power4#State=0 do SerialSend5 A00400A4 endon
In order to turn on the rule enter ‘Rule1 1’ in the console and you should be good to go.
If you ever come across the fact that the address info in Office 365 does not reflect your AD in respect to the country then the subject probably tells you what to do.
We don’t have many but there are international moves that occur within the company. Not that long ago somebody attended us that their country information on the Office 365 portal didn’t match. This whilst his on premise information within Active Directory did.
It seems like the value that is used via Azure AD Connect is the value present in ‘co’ within Active Directory. When using the normal management tools if the value in the directory got updated it would change both ‘c’ as well as ‘co’ entries (both represent ‘country’). However if updates occur via scripting in Powershell if the value of ‘c’ got updated, the value of ‘co’ remained the same. So if you come across this you probably have an automation running somewhere as did we that changes address information when needed make sure you update both.
Using an array rather than the incremental value that is now published on the mysensors.org website. This array method was used in the older version of the relay sketch before the upgrade to version 2.0. In order for upgrading from 1.5 to 2.0 for the relay boxes I’ve build it is far easier to stick to the the array method as most have an single relay board with eight relays on it which doesn’t fit in the current sketch any more.
/*
 * The MySensors Arduino library handles the wireless radio link and protocol
 * between your home built sensors/actuators and HA controller of choice.
 * The sensors forms a self healing radio network with optional repeaters. Each
 * repeater and gateway builds a routing tables in EEPROM which keeps track of the
 * network topology allowing messages to be routed to nodes.
 *
 * Created by Henrik Ekblad <henrik.ekblad@mysensors.org>
 * Copyright (C) 2013-2019 Sensnology AB
 * Full contributor list: https://github.com/mysensors/MySensors/graphs/contributors
 *
 * Documentation: http://www.mysensors.org
 * Support Forum: http://forum.mysensors.org
 *
 * This program is free software; you can redistribute it and/or
 * modify it under the terms of the GNU General Public License
 * version 2 as published by the Free Software Foundation.
 *
 *******************************
 *
 * REVISION HISTORY
 * Version 1.0 - Henrik Ekblad
 *
 * DESCRIPTION
 * Example sketch showing how to control physical relays.
 * This example will remember relay state after power failure.
 * http://www.mysensors.org/build/relay
 *
 *******************************
 *
 * UPDATES
 * Version 1.1 - Eugene Dullaard
 *
 * DESCRIPTION
 * This version uses an array of defined PINs like the v1 example
 * sketch did, instead of a startpin and counting from there.
 * The example is currently setup for Arduino Nano with 12 Relays
 * configured. Debugging and repeater is turned off.
 */

// Enable debug prints to serial monitor
//#define MY_DEBUG

// Enable and select radio type attached
#define MY_RADIO_RF24
//#define MY_RADIO_NRF5_ESB
//#define MY_RADIO_RFM69
//#define MY_RADIO_RFM95

// Enable repeater functionality for this node
//#define MY_REPEATER_FEATURE

#include <MySensors.h>;

/* Just adjust the number of relays to your need, the Maximum is twelve
 * There is no need to adjust the amount in the RELAY variable inless
 * you want to change the order in pins as used in your project.
 * As a reminder pins A6 and A7 are analog only and cannot be used.
 */

const int RELAY[] = {3, 4, 5, 6, 7, 8, A0, A1, A2, A3, A4, A5}; // I/O pins for the relays
#define NUMBER_OF_RELAYS 12 // Total number of attached relays
#define RELAY_ON 0  // GPIO value to write to turn on attached relay
#define RELAY_OFF 1 // GPIO value to write to turn off attached relay


void before()
{
    for (int sensor=1, pin=0; sensor<=NUMBER_OF_RELAYS; sensor++, pin++) {
        // Then set relay pins in output mode
        pinMode(RELAY[pin], OUTPUT);
        // Set relay to last known state (using eeprom storage)
        digitalWrite(RELAY[pin], loadState(sensor)?RELAY_ON:RELAY_OFF);
    }
}

void setup()
{

}

void presentation()
{
    // Send the sketch version information to the gateway and Controller
    sendSketchInfo("Relay", "1.1");

    for (int sensor=1; sensor<=NUMBER_OF_RELAYS; sensor++) {
        // Register all sensors to gw (they will be created as child devices)
        present(sensor, S_BINARY);
    }
}


void loop()
{

}

void receive(const MyMessage &message)
{
    // We only expect one type of message from controller. But we better check anyway.
    if (message.getType()==V_STATUS) {
        // Change relay state
        digitalWrite(RELAY[message.getSensor()-1], message.getBool()?RELAY_ON:RELAY_OFF);
        // Store state in eeprom
        saveState(message.getSensor(), message.getBool());
        // Write some debug info
        Serial.print("Incoming change for sensor:");
        Serial.print(message.getSensor());
        Serial.print(", New status: ");
        Serial.println(message.getBool());
    }
}
Spend some time today doing updates as that didn’t happens since 2017. Number 11 arrived in that year. Most of the holiday pictures where added however at this moment there is a significant amount of pictures missing from Japanese and Italian destination of 2016/2017. Italy is missing completely still and about half of Japan is done. For this year not many pictures to post unless the backyard is a holiday destination. I for sure am glad I have a backyard to use this year.
Update: Japan 2017 is complete and start of Italy is there, so is number 11.
In a flair of …… I backed the ZX Spectrum Next Issue 2, essentially my start into computing with in 1984 the ZX Spectrum 48K (rubber keyed version). As only other system I’ve owned the 128K Toastrack model which in hindsight I should not have sold as their value is more than what I paid for in those days and back then I sold it for 150 Dutch Guilders, like 70 Euro’s (not counting inflation).
DSN (write): NOT OK(SQLSTATE[HY000] [2002] No such file or directory) .
This is what you see when you try to configure a RoundCube installation on a virtual host within webstation on a Synology NAS using MariaDB 10 as a backend database (maybe 5 as well, as I’m not using that).
The solution is to modify the PHP profile you created for RoundCube (or if you didn’t create a specific one maybe do so now in order to avoid issues with other virtual hosts on the platform).
On the advanced settings window of your PHP profile, choose the ‘core’ tab and modify the below two settings in order to get your RoundCube installation connected to your backend database:

 Had issues getting the ownCloud client to work after doing an inplace upgrade from Ubuntu 20.04 LTS to 22.04LTS. Read various other articles that didn’t really help me. Most did point to the official ownCloud repository and in there is a file called install.sh, looking at that this would do all the tasks required to get the repository working and install the ownCloud client as well. After doing this, without uninstalling the current non working client, it was working. The only thing was that I had to disable and enable the “Launch on Startup” option and it was done. It is safe to say that the client in Ubuntu’s own repository will also get updated at some point in time and it becomes a non issue. Below are the steps performed.