
Aimori, Japan
A freezing start of this years holiday…… Long trip from Tokyo, short stay.
ATTiny85 One Button Timer
For if you have a need. Single switch button with three LEDs to indicate the amount of time you want to set. In the configuration you can set the time per unit (20 minutes in the code below). After turning it on, the three LEDs should start to burn so to check they work, then when pressing the button it will start the time. You can at anytime adjust the time which will then be reset to the amount of time you want. If you want to decrease the time you have to cycle until the end after which it will go back to the lowest setting. 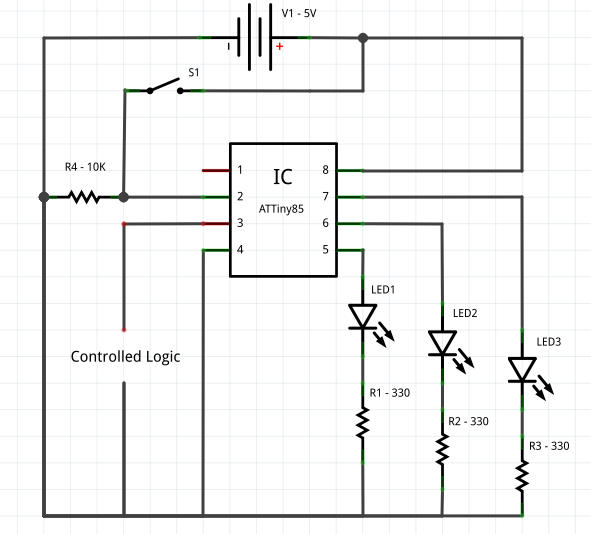 Total times works in the same way as binary, given the value in the code is 20, the first LED is 20, the second 40(2x) and the last 80(4x). Now by pressing the button you can choose between 20 to 140 minutes of delay before it switches off the timer. There is also a random time function which is activated when all LEDs are turned off, this will pick a random time between 40(2*) and 140(7*). As the amount of i/o is limited I’ve used an ATTiny85 rather than a complete Arduino, by modifying which pins it is using the code can be used on an Arduino as well.
// Button Timer 1.0 for ATTiny85
// Update 1.1 : Added 0 (no LEDS) as a random timer with a pre-defined minimum and maximum of 7

// Control a device through relay or optocoupler for a set period of time.
// Time can be adjusted during operation, cycle through all option before
// returning to lower values again, following a binary like display.

// Global Initialization

int Timer = 20;       // Default timer value (lowest and incremental factor) = X
int TimerInc = Timer; // Incremental Timer value to calculate Timer changes
int TimeLED[3];       // LEDs indicating time (X, X*2, X*4)
int TimeLEDSP = 0;    // First of the three Pins for the TimeLEDs,
int TimeInSecs;       // Timer expiration counter
int TimerButton = 3;  // Button to change time
int TimerRelay = 4;   // Relay that is on for duration of Timer
int RandomOn = 0;	  // 0 = Random off; 1 = Random on
int RandomMin = 40;   // Minimum random time in minutes

void setup() {
  int SetupTMP;       // Temp Var within Setup
  int SetupLoop = 1;  // Loop Var within Setup

  // Mapping PINs and setting them to either input or output
  for (SetupTMP = 0; SetupTMP < 3; SetupTMP++) {
    TimeLED[SetupTMP] = SetupTMP + TimeLEDSP;
    pinMode(TimeLED[SetupTMP], OUTPUT);
  }
  pinMode(TimerButton, INPUT);
  pinMode(TimerRelay, OUTPUT);

  //seed random number generator with noise from an unconnected pin
  randomSeed(analogRead(A0));

}

void loop() {
  int MainTMP;        // Temp Var within Main
  TimeInSecs = 60 * Timer;

  // Test Procedure, run all lights wait for TimerButton push, after push TimerRelay turns on
  for (MainTMP = 0; MainTMP < 3; MainTMP++) {
    digitalWrite(TimeLED[MainTMP], HIGH);
  }
  MainTMP = 1;

  while (MainTMP == 1) {
    delay(1000);
    if (digitalRead(TimerButton) == HIGH) {MainTMP = 0;}
  }

  for (MainTMP = 0; MainTMP < 3; MainTMP++) {
    digitalWrite(TimeLED[MainTMP], LOW);
  }
  digitalWrite(TimerRelay, HIGH);

  // Main Loop, wait until time runs out or button is pressed to increase time (one sec interval)
  while (TimeInSecs > 0) {

    delay(1000);        // 1 Second delay
    TimeInSecs--;

    // Button is pressed, add and recalculate time, if max is reached go to 0/random value
    if (digitalRead(TimerButton) == HIGH) {
	  if (RandomOn == 1) {
	    Timer = 0;
		RandomOn = 0;
	  }
      Timer += TimerInc;
      if (Timer > (TimerInc * 7)) {Timer = 0;}
      if (Timer > 0) {TimeInSecs = 60 * Timer;}
	  else {
	    TimeInSecs = (random(RandomMin, (7 * Timer)) * 60);
		RandomOn = 1;
	  }
    }

    // Show Time through LEDs
    MainTMP = Timer;
    if (MainTMP >= (TimerInc * 4)) {
      digitalWrite(TimeLED[2], HIGH);
      MainTMP -= (TimerInc * 4);
    }
    else {
      digitalWrite(TimeLED[2], LOW);
    }
    if (MainTMP >= (TimerInc * 2)) {
      digitalWrite(TimeLED[1], HIGH);
      MainTMP -= (TimerInc * 2);
    }
    else {
      digitalWrite(TimeLED[1], LOW);
    }
    if (MainTMP >= TimerInc) {
      digitalWrite(TimeLED[0], HIGH);
      MainTMP -= TimerInc;
    }
    else {
      digitalWrite(TimeLED[0], LOW);
    }

  }

  // Turn relay off after timer has expired
  digitalWrite(TimerRelay, LOW);

}
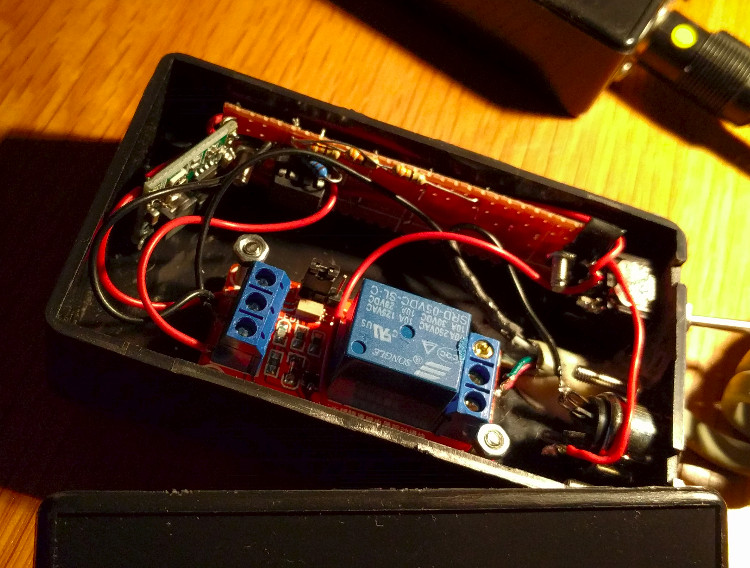
My own build on a little bit of perfboard and put together with a relay in the smallest box I had lying around.
Number 11
…. has arrived in the form of a 2.0 GT package, the only 2.0 version available in Europe, all others are 1.5 liter engines. Contrary to the previous version this sits a bit more comfortable and less sporty, the previous one was a Sport package with Recaro seats in it, These bucket seats made getting in and out a bit harder compared to this one with standard seats. Makes it a bit easier on myself, I do get older as well.

This is the first car I owned with LED lights, noticed that with the type of weather on this picture the lights tend to dim during the ride as the snow doesn’t melt off properly like it did with halogen or normal lights. The picture was taken directly after a 40km ride with light snow, so not even too bad that time.
Kace 2000 Model Specific
The following script can be handy if you want to deploy certain computer model specific software within a scripted installation on Dell Kace 2000. It might be usefull for other things as well (Windows Deployment Services maybe) if you want to check if it applies before applying the software or script.
@ECHO OFF
REM Obtain Computer Model information from WMI, this is done in two ways, check output for
REM both to which applies best, for example 'model' works best with HP and 'version' works
REM best with Lenovo. If something  applies to all computers from a single brand 'Manufacturer'
REM can be used.

REM Version 1.1, Added support for model and manufacturer

set model=
set version=
set manufacturer=

for /F "tokens=2 delims='='" %%j in ('wmic computersystem get model /value') do set model=%%j
for /F "tokens=2 delims='='" %%j in ('wmic csproduct get version /value') do set version=%%j
for /F "tokens=2 delims='='" %%j in ('wmic computersystem get manufacturer /value') do set manufacturer=%%j

REM Enter the Computer Models for which the package should apply below, one per line
REM Change the 'if' statement to what works to detect the right hardware, the above 'wmic'
REM commands can be run on the hardware to determine what is the best option.

If "%model%" == "HP EliteBook 2560p" GOTO INSTALL
If "%model%" == "HP EliteBook 8460p" GOTO INSTALL
If "%model%" == "HP EliteBook 8560p" GOTO INSTALL

GOTO GOODBYE

:INSTALL

REM Enter Command Line for Silent Installation below

launcher /S

EXIT

:GOODBYE

EXIT
If you want to check what to use, just putting the wmic commands into a batch file should give you the right amount of info which of the checks would work for the computer you want to deploy:
@echo off
wmic computersystem get model /value
wmic csproduct get version /value
wmic computersystem get manufacturer /value
I see this working out
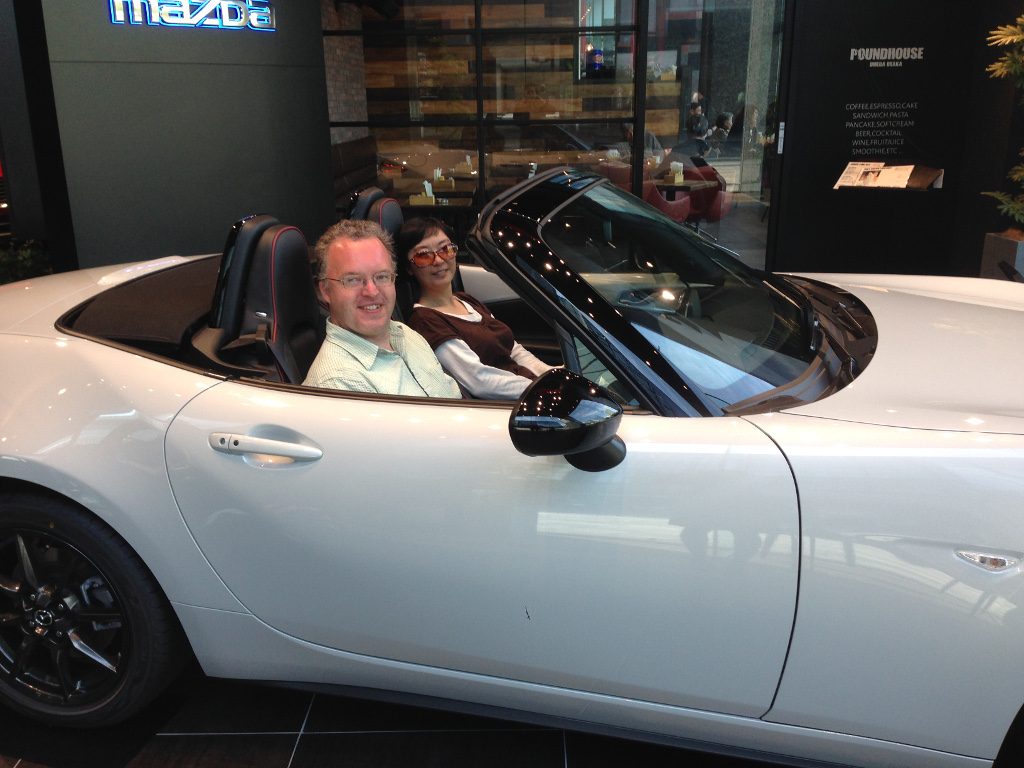 Came across a Mazda showroom in the Umeda Sky Building (Osaka) with a new MX-5 in there. Couldn’t resist trying it out. Much more resembles my old NA then my NC getting into it as it feels like the seat is lower. Due to being in Japan the drivers side is on the right, which for us just feels odd. Also Sunny liked it which was for me a good sign as such the title of this post. 🙂
Osaka, Japan
Last day, travelled throughout Osaka the whole day. Japan, no idea what to expect and now looking backward, definitely worth a future visit.
Nara, Japan
Greetings from Holland….. err, no, I’m still illiterate, got fooled by the rain. Welcome to Nara, on a rainy day with a lot of deer that decided it was way nicer under the trees and right they were. Anything under the jacket was completely soaked.
Kyoto, Japan
Felt right at home, they paint almost everything in the Dutch national colour. How nice of them.
Oops…
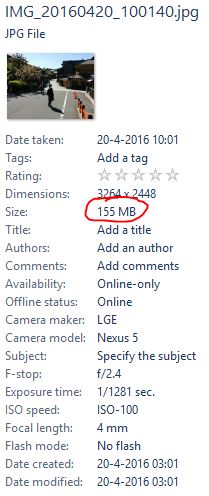 That’s one large file, not sure what the phone was thinking but it contains a bit more than just the picture as dimension wise it is no different than the others and they average between 2 to 4 Mb.
Yes, we take photo’s with a standard smart phone. As in most cases we move about a lot we try to carry as less as possible. Essentially anything you didn’t use the last time, you do not pack the next time. I would suggest to pack the things you missed or couldn’t acquire as long as it passes the airline restrictions of these days.
To Japan we actually took one small suitcase, but it was left behind when moving locally, which was a first in years with the exception of China. I think I can even go without a suitcase to China as there is still clothing left at my in-laws. But better to take one with me, otherwise you stand out and get picked out of the queue by local customs.